Saturday, June 25, 2016

Pi Manipulator Build - Part 1

Here's the latest thing I've built: (screen not entirely tucked in yet...)

I'm into wearable technology, now.

Base specs for the machine are:

  • Raspberry Pi Zero - 1Ghz ARM processor, 512Mb of RAM
  • 8Gb SD card with Raspbian Jessie
  • WiFi 802.11n adapter
  • MPU6040 accellerometer/gryo inertial sensor
  • 1/5" PAL/NTSC LCD television, 240x180 pixels
  • Turnigy Nanotech 950mAh 1-cell LiPo
  • Polulu 5v step-up voltage converter/regulator.
  • 2 old mouse buttons
The MPU6040 sensor is used by my 'gyromouse' driver, which means the manipulator has a fully functional X11 GUI interface. I can run most linux apps, (that don't require large screens or shift-click combos) and even use the 'Florence' on-screen keyboard if I need to tap out a few characters. (yes, it's painfully slow.)

The screen is just resting on top.
Once I push it in, I'm not sure it's coming back out.


What makes the device actually useful is that it's a full Linux machine, with a WiFi connection. That makes any nearby PC that can run SSH or VNC into a handy keyboard, mouse and 'big' screen. Or even a remote PC - once the manipulator is on the network, it doesn't matter where it is, or you are. It acts very much like a 'cloud server' which just happens to be located on your wrist.

What I _can_ easily do is pre-create the equivalent of desktop shortcuts that run shell scripts or any arbitrary action you can do on a linux machine. The ultimate programmable remote control - that can also show you progress and logfiles.

Why do I need such a thing? Well, personally, I've found that doing digital astronomy is a pain in the ass if you have to keep running between the telescope and PC. Especially if one is inside the house. Or you're in the field, literally.

The main person who will get to use it is a unix security expert, for whom having a wifi-scanning wrist strap (running Kismet) is a useful work tool.

Neither application requires a lot of user interaction - just enough to navigate a few menus and click a 'start' button or two - but they're apps which have a lot of status displays it's handy to keep an eye on.

The build proceeded in very careful steps. I'd actually developed the software in advance on my Pi A+, so when the Zero and other hardware pieces arrived, I was basically ready to go. It only took a couple of hours to hook up the primary components and give everything a whirl.

The parts on arrival.

It's always good to check your parts individually if you can, so I test-fired up the Pi with my prepared OS on a standard monitor/keyboard setup, despite the ridiculous relative size of the connectors and cables. All fine.

HDMI cable with an end-cap made of computer

After that, I spent a good hour or two just staring at all the pieces, physically and mentally stacking them in various ways, and trying to plan how they were all going to fit together.

Jenga!

The RCA connector for the LCD module's video input was far too big, and even the 4-pin "low profile" socket is comparatively large.

80-year old socket technology.

So the first thing was to pop off that connector and direct-solder to the Pi's video output. I also de-cased the WiFi adaptor and direct soldered that to the Zero as well.

Naked WiFi dongle.

Almost like they expected us to do this kind of thing.


Then time for another test, to make sure the LCD module was working.

First LCD test

Perfect. By this time it was getting late and so I wound down by wiring up the Polulu voltage converter to a handy LiPo and testing that out. I hadn't used a Polulu before, but I'm impressed. Quality little component. Get some.

Not actually sure of the capacity of this battery. About 600mAh?

I didn't want to plug an untested power converter it into my shiny new machine, so I tried it first on an old Arduino board that's seen it's share of action.

Your bravery is appreciated.

And to finish the night, the first un-tethered boot of the machine:
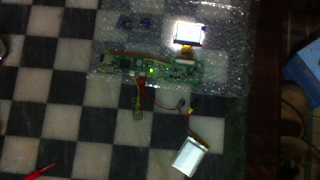
First boot from battery. All systems go. Power stable for 63 minutes.
A good first day. I slept well.

The next day, I added the MPU6040 inertial sensor and a single membrane button I pulled from an old remote control. I put some heatshrink tubing around various easy-to-short components like the WiFi adapter, and then very carefully folded up all the boards into a neat little package.

Now it's looking more like a... um... thing.

Another boot to make sure it's all still working, and if gyromouse has started up properly. Which it had.  It took longer to find an on-screen keyboard that worked properly. "matchbox-keyboard" is the one you'll see mentioned, but it was chewing up my CPU because of a known bug, and I switched to "Florence" instead. Which has different issues, but nevermind.

Taking "hunt and peck" to a new level, but the GUI is useable.
Now that I had a mouse-equivalent and an on-screen keyboard, I could finally run a few apps. Like the web browser.

Doing a google search

Or kismet:
Detecting nearby Wifi devices...

Or even Minecraft.


At this point I was feeling pretty satisfied with myself. I spent the next day or two tuning gyromouse, setting up the desktop and generally getting everything nice.

It's this point where I started to realize just how much power the LCD module was consuming. Not actually the screen, so much as the video decoder chip that drives it. The module specs say "120mA at 5V" and really means it. I suspect most of that goes through the decoder, which in normal operation gets almost too hot to touch.

The LCD power consumption will be important later, because addressing it has become the one remaining issue in the build, though not for the reason you probably think.

Apart from that, everything was going well. Really well. (too well?) All the computer hardware and software was working, and all I  needed to do now was fit it into some kind of case. I had just the thing in mind, and was checking the mailbox every day in anticipation.

Then it arrived! My Official Doctor Who Vortex Manipulator! Batteries Included! I've just got to scoop out the old insides, and put my hardware in its place.

'cause if you're gonna build a computer into a wrist-strap,
why not do it with some style?

Yes, I'm a fan, but I also appreciate the thought that went into this particular prop: Capn' Jacks' personal device. Half wallet, phone, keys, and watch. So sensible an idea that no-one gives it a second thought. Well of course future advanced humans strap their mobiles to their wrists on cool beat-up leather bands. Why wouldn't you?

Why don't we?

But then it became obvious - it wasn't going to fit. At least, not the toy version. The real prop is about 50% bigger and probably would have worked nicely. But an accurate replica is also about twenty times more expensive, and I'd never have been able to bring myself to damage it.

The original toy also has one working button,
which activates a blue light! Wow!
At this point, I had a long, long think. And a talk to my friends about leather-work. Basically, I had two choices: try to fit the manipulator into the toy, or get a new custom wrist-strap specially for the project.

I chose both.

Eventually I'll get a custom wrist-strap built - already made inquiries. I'll have to build  a hard case to hold the components too. (Or use an Altoids gum tin, perhaps, since that seems the right size.) But in order to figure out the issues, I decided to go ahead and try to stuff everything into the toy anyway. I didn't have any real use for it otherwise, and I figured I'd learn a few things that would be useful in building the "real" manipulator.

And I expected to fail. The Pi Zero is slightly bigger than the strap is wide. I didn't expect it to fit. It shouldn't have fit. But somehow it did.

Bigger on the inside?

Next time, I'll show you how I managed it. Also, how I snapped the SD card containing the entire OS in the process, I'll sum up where I've got to, and the few problems left, and what's next, It's a rollercoaster.


Monday, June 13, 2016

SnailMail - Batteries Not Included

So I had a weird call today from one of my electronics parts suppliers, and apparently they "can't ship LiPos anymore", so that part of my order has been refunded.

Given this particular LiPo is about the size of a credit card and I've ordered enormous batteries from HobbyKing in the past - this sounded strange to me! So I looked into it and yes, the internet boards are newly filled with hate for Australia Post and IATA over the reclassification of LiPos as "class 9" dangerous goods.

Or something. No-one's really sure, except AusPo won't take their batteries anymore.

What I think that means is that a whole new documentation path needs to be applied for transporting LiPos via air, and most of Australian Posts' inter-city mail goes that way. And AusPo either doesn't have the ability, or doesn't want to, supply all the new paperwork.

Sounds annoying, until you realize that it's not just big RC batteries, it's apparently anything with lithium. Installed or not. Coin cells included. Which means people are being told they can no longer send ordinary things like watches and mobile phones through the post that, perhaps they already sold to someone on eBay. It's not even just a matter of "you have to remove the battery before posting" and expecting the receiver to somehow find a matching replacement - look at a modern iPhone or iPad. Remove the battery - how?!?!

Couriers are apparently still able to get LiPos through, at increased cost of course. But there's vast amounts of mail in international transit that might end up being returned because it doesn't have the required documentation. Maybe.

So, the nations primary package carrier now no longer will carry the majority of the things that we use and sell to each other, due to an air transportation safety rule change. Apparently they hate electronic mail so much they're withholding our electrons.

Makers are particularly hard hit, because we can't get parts, and we can't ship our creations. Well, not using our "national infrastructure" - in which case, what's it for?

The rule change may even affect carry-on luggage for plane passengers. Or it might not. It might all just be temporary, while they sort out systems. Or it might be a federal crime to post an iPhone from now on. No-one is completely sure right now, because inconsistencies abound, straight answers are hard to come by, and official documents keep going up and down on the web like well-formatted yoyos..

Hmm. "Well formatted yoyos." I think that's my new name for Australia Post.

Wednesday, June 8, 2016

GyroMouse Preview

So, I'm putting together another "Device". I make them occasionally. Some of them even work.

GyroMouse Prototype.
MPU6040 IMU Attached to Raspberry Pi Model A+

While I'm waiting for most of the specific hardware pieces to turn up from all over the internet, I've been slapping together prototype parts and getting the software at least vaguely right. I find that helps.

One goal for this new device is to be compact, so I'm going to use a Raspberry Pi Zero (which I believe is in the post. They're a little hard to get.) So compact that the entire machine can be wrist-mounted, smart-watch style.

And in fact, that's working out fairly well. The Pi Zero is only 70x30mm, 1.5" screens are about 30mm vertical. I have a very specific 80x40x20mm lozenge-shaped space that I need to fit, for reasons which will become obvious in later posts.

You can fit a whole 512mb / 1Ghz processor with GPU hardware in that space, with enough battery to run for hours. WiFi dongles are mostly just connector now.

What's hard to fit is any kind of human-friendly input device. The screen is so small that "touchscreen" tech would be ludicrous. It might be nice to turn the entire surfacebeyond the screen into a capacitive touchpad, but there's no ready sources for such a module, and I'm trying to use Adafruit-level commodity pieces.

Assuming I've got a small linux machine with X11 on my wrist, what's the best way of using that device? Well, mouse is probably still it, in terns of compatibility with existing software. With a mouse you can run an on-screen-keyboard if you have to. It will do everything, if badly.

So to fit something like a mouse in the space available, I've written a little program which listens to a MPU6040 Intertial Management Unit and interprets it's movements as mouse commands. Gyro rotations in X and Y move the mouse cursor, and "taps" on the device (detected by the accellerometer) are interpreted as mouse clicks. At least for today.


To control a tiny computer you need a tiny input device!


 As of an hour ago, it works. I had to go through four "i2c" libraries to find one that's stable under node.js, ('i2c-bus" is the one you want.) I'm not happy with the CPU usage to be honest, but it does actually work. I can push the mouse cursor around the desktop by tilting the sensor various ways, and even click on things with considerable difficulty.

Size comparison against my usual mouse.

I'm using Gyros for movement and Acceleration for mouse 'clicks', which is quite different from the "accellerometer" mice I've seen before. The difference there is, accelerators measure "tilt" due to gravity. So in those cases, the mouse cursor acts a lot like the little steel ball in those closed maze puzzle games, rolling around on a flat surface.

Sounds like a good idea at first, but you're asking people to keep the device perfectly flat in order to keep the mouse still. Most people don't intuitively know where "perfectly flat" is.

Gyros sense relative rotational motion. The turning to and fro of an object. Gyros are the most important part of a Quadcopter's IMU, which I know well.

Funny thing, I did a search and I don't think anyone else has built a gyromouse. They all go for accellerometer-mice. Well; technically the Wii-mote, but it also uses the IR lights, so it's a hybrid.

Is this the world's only Gyromouse?
To be honest, I haven't really looked that hard.

GyroMouse works off the relative turning motion of the chip to simulate the movement of a mouse. And it detects the "freefall" moment of when you tap the device downwards as a mouse click. It feels horrible, needs extensive tuning, but it functions. I can click on menus. I might be able to extend it to detects 'taps' in various axes, so whacking this particular device from the sides might end up working as other buttons, or maybe the scroll wheel.

I think that's called a "kinetic interface". Similar, although slightly different to "percussive maintenance". But that's kind of the point here... to experiment with what happens when you make a computer aware of it's physical state, and smart enough to respond and adapt.

If you want to be mean, you can denigrate the whole thing as an over-complicated Wii-Mote. And you'd be right. It's a Wii-Mote that doesn't need the Wii. It does everything all by itself.

Right now this is still at proof of concept stage, though later on I'll release the code when it's not quite as embarrassing, and the real hardware has arrived. Leave a comment if you're interested.

Friday, June 3, 2016

Curiosity Physics Demo

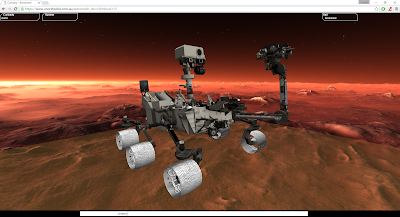
Another video; made while testing out the physics engine scripting. This is my most complicated physics demo to date: a fairly complete mechanical model of the Curiosity Mars Rover:


Unlike the 'Atomic Caffeine' demo where you don't really notice that the behavior is a little un-physical, the rover is technically a real vehicle. And you can feel it go over every bump and step. There are moments I forget it's a simulation, and I built it.

Actually, this is what the rover would drive like if it lost independent steering on all four corner wheels (they're not supposed to just spin freely like a broken shopping-trolley wheel like that, they're supposed to be precisely controlled) and was being driven purely on differential speeds, like a treadless tank. You can see why NASA likes this configuration, it's very robust.


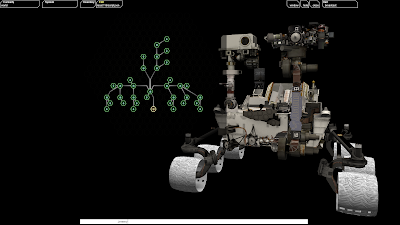
The 'hexcode' visual script editor has also come a long way in a short time. This was the initial build script, with a set of COLLADA model files containing the parts like wheels, chassis, camera mast, etc. arranged into 'reference frames' to check that everything was where it should be.


The new item/inventory system is working out well. Most of these designs are edited directly inside the browser from local storage. (No more google docs!) When I'm happy, a copy is uploaded to the web server for everyone to see.


Looks nice with an appropriate 'SkyShader' background, although Simulated Mars really hits the FPS, let me tell you.


The fully completed 'program' for the rover removes the heirarchy, (all frames are attached to the root) and then physical constraints are created between them.

Is it a bird? Is it a plane? No, it's a visual programming language!

Quite a lot of progress. Only a day before, the first attempts to import the rover looked like this:

Explody

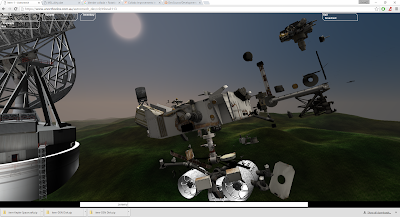
Other NASA models are also making an appearance in Astromech. The corner of the Deep Space Network 70m dish can be seen above, and here's the Z2 spacesuit standing on the bridge of my (fake) Starship Tyson over Simulated Mars.

Hi!

That's actually the first "Avatar" in Astromech. The first humanoid figure in the system. And likely to become the default choice for user representation. Although in deference to the sensibilities of a friend of mine, I'm probably going to make a version in a gold lamé material.

Mentally queue track  "Journey of the Sorcerer" now.